Masterclass in Photo Colorization

Edwardian Portrait

Colorist

Vera Zvereva, CODIJY Team
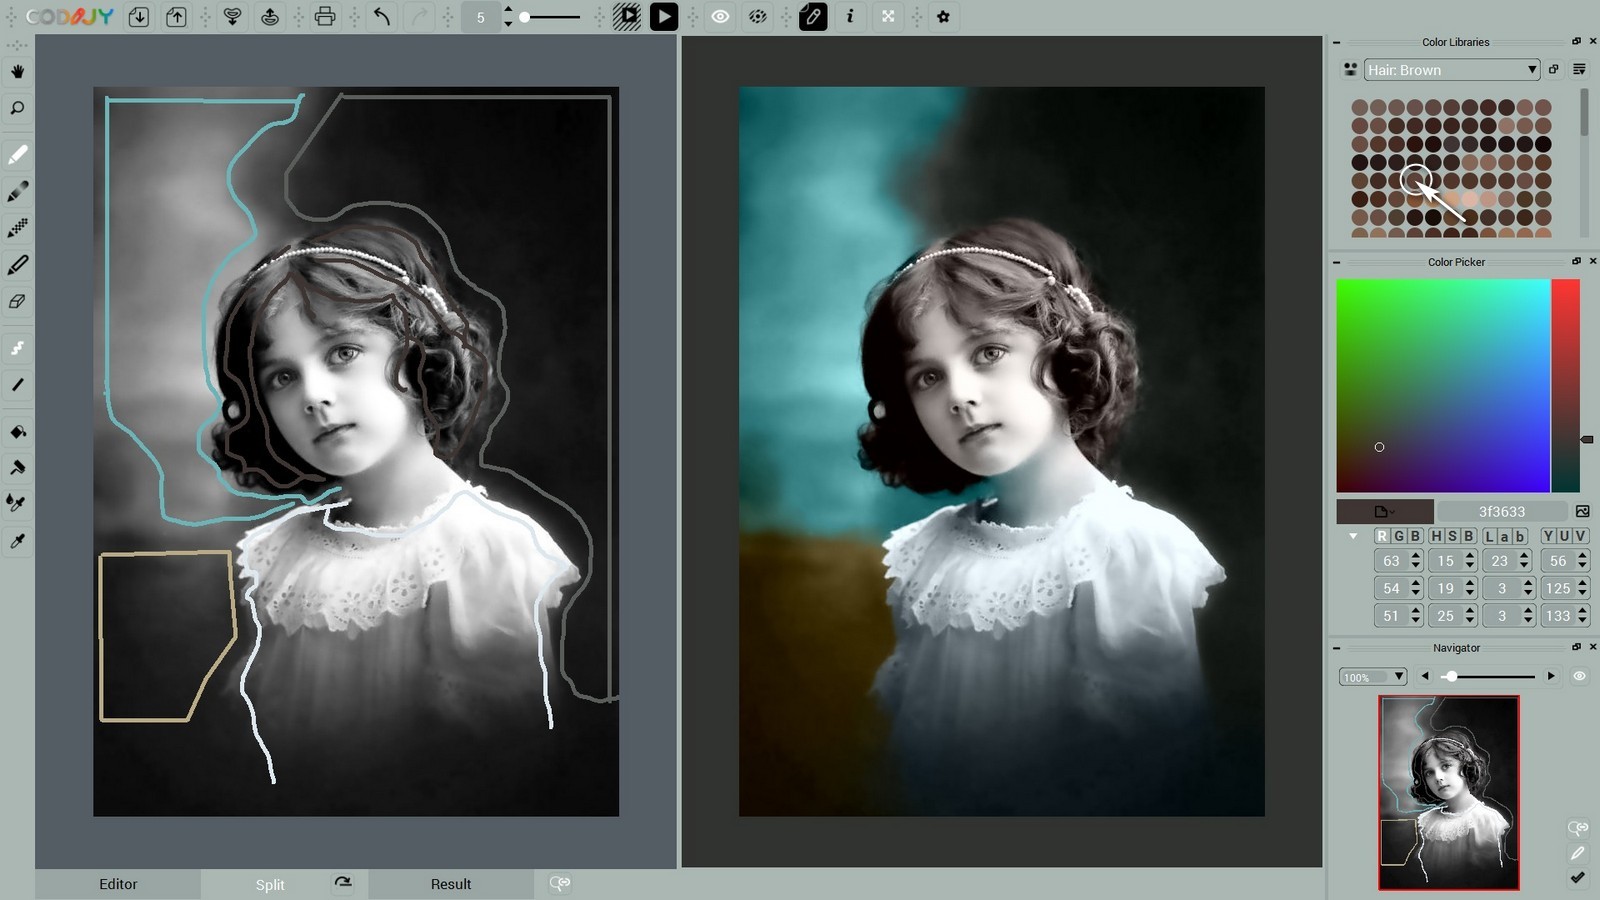
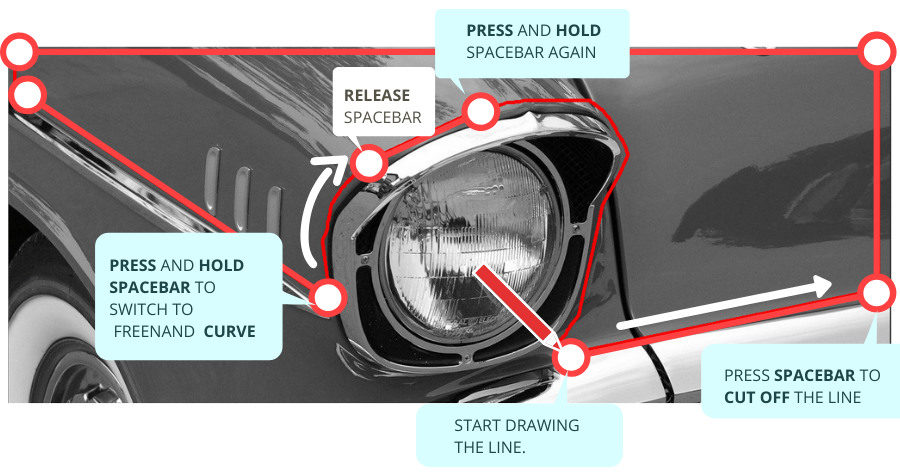
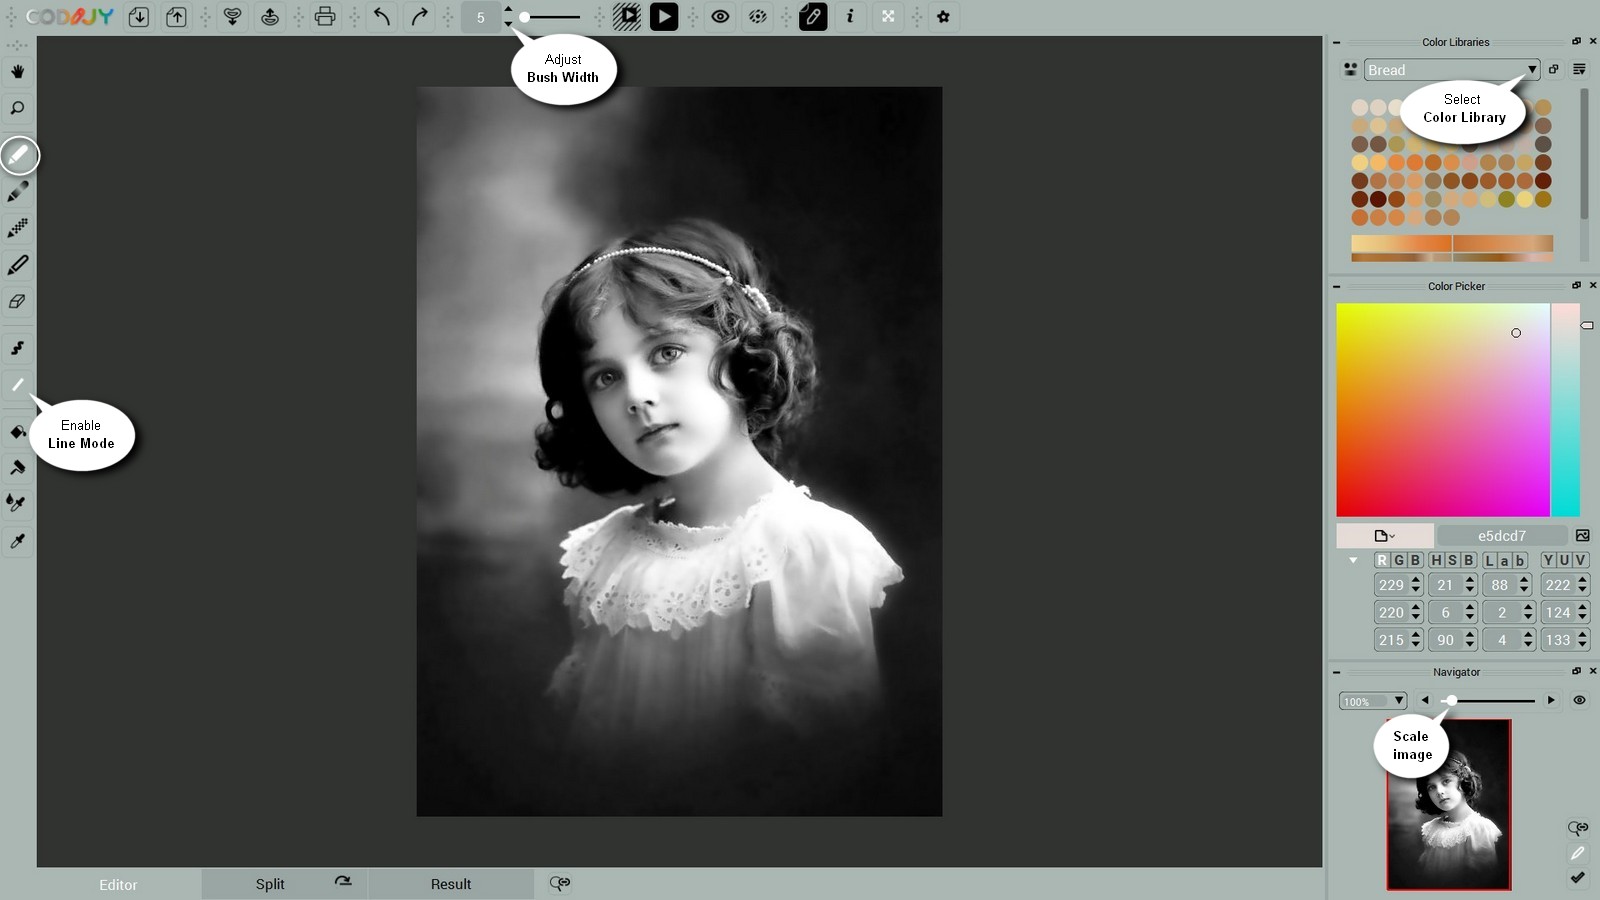
This simple colorization exercise will bring you lots of fun! You'll practice picking and sketching colors and get the feel of the colorization with CODIJY software in half an hour! 

this tutorial requires

Want to learn how to colorize a photo with minimal knowledge? Start with this Edwardian masterpiece!

We will show you how to use libraries and colorize this lovely photo step by step. If you have CODIJY Recoloring, please  follow us using example file with saved colors.  

Before you start, download the CODIJY file. The colors we are using in this tutorial are saved the History of the document. 

We will colorize this photo in two stages, moving from the backdrop and dress, to the face of this cute child.  

If you need help with some of the steps, check out how to:

->  Open a file in CODIJY 
->  Draw color masks
->  Generate color preview in CODIJY
->  Export the colored result to JPEG or other image 

Edwardian portrait. Circa 1890.

get Prepared

Open example file. Enable the Pen tool and set it to the Line mode .

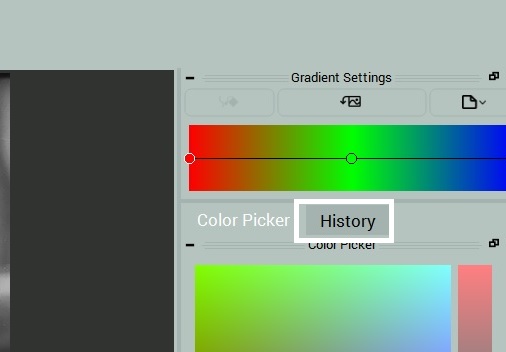
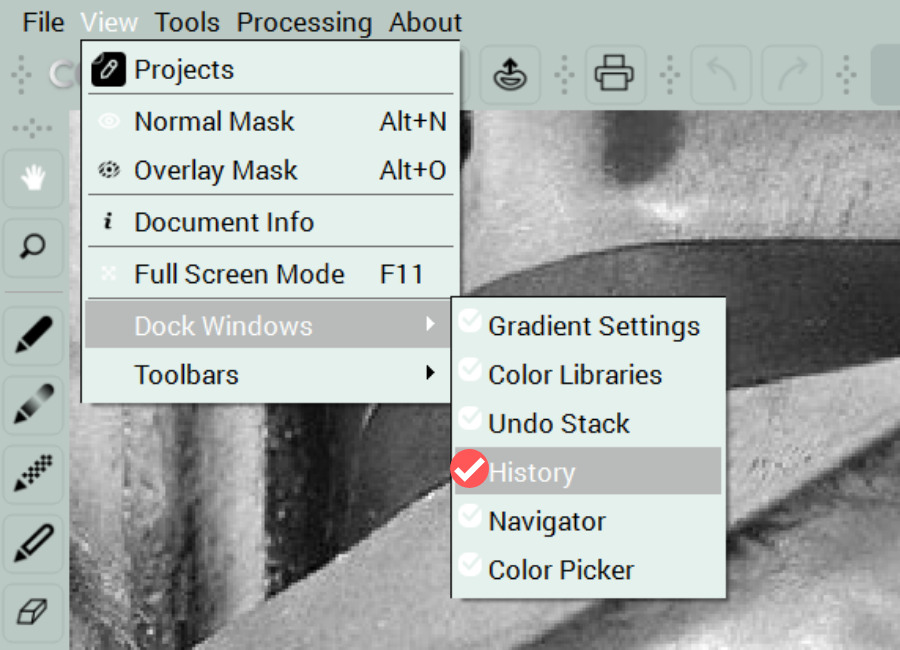
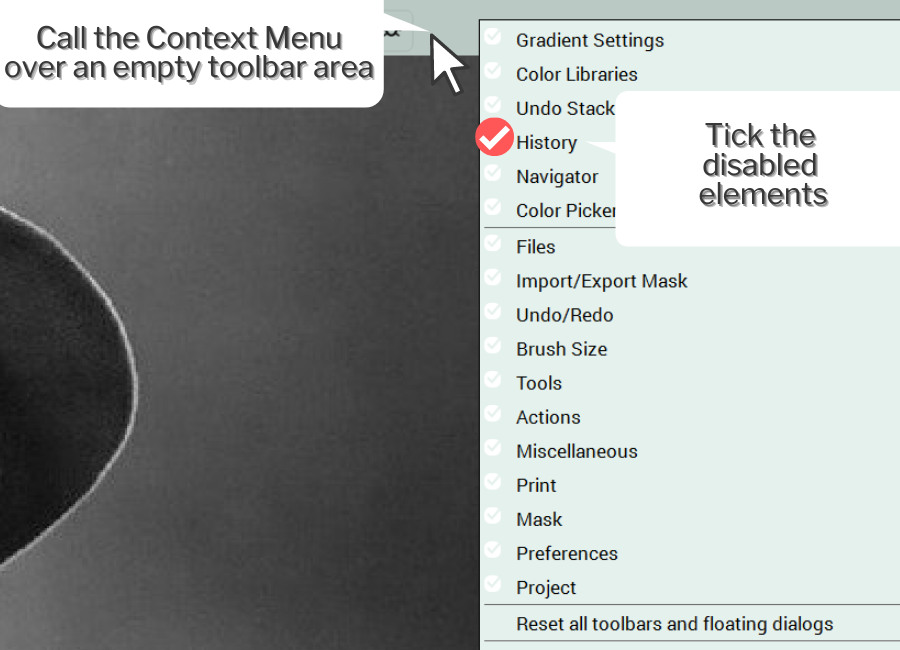
NOTE: If you want to use saved colors, open the History of the document. If you cannot locate it, learn how to navigate to the History tab. 

Colorize the backdrop

->  Open the Photo Backgrounds library   

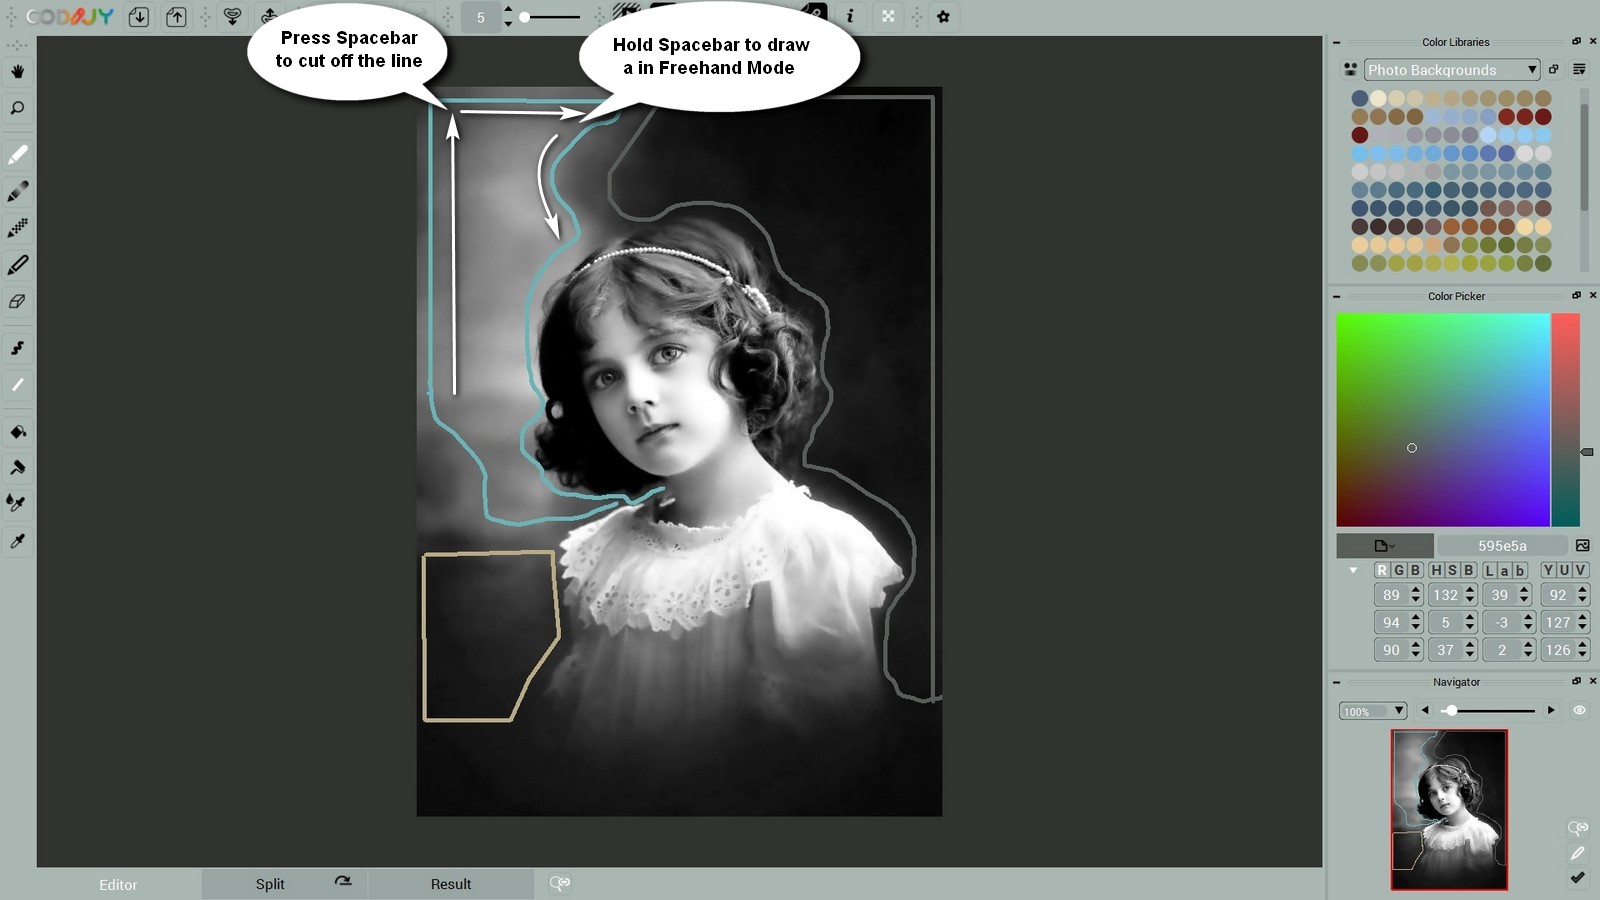
Pick the tone of blue for the “sky” and start drawing the line along the photo edge. Try to keep not far from the edge.

When you reach the curved boundary, switch to the Freehand mode

 Tip: To draw the whole shape without releasing the mouse button, use quick-draw hotkeys. 

Colorize the dress

->  Open the Clothes: White Shirts library   

Next, outline the white dress with the tone of white. Make sure to draw the stroke close to the blurred part of the border. 

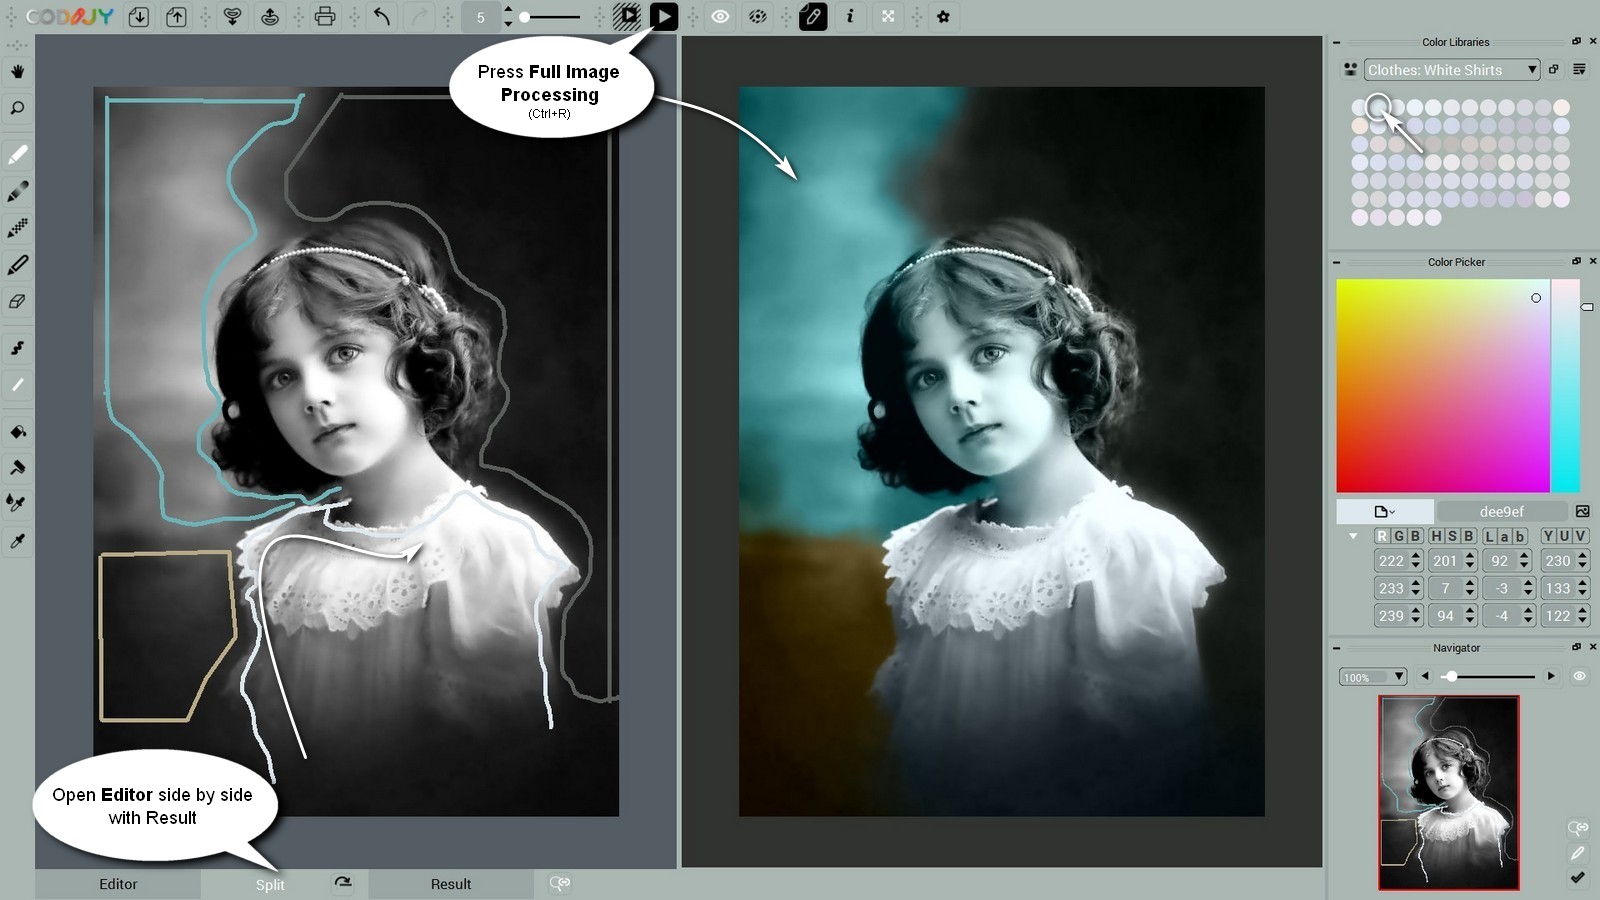
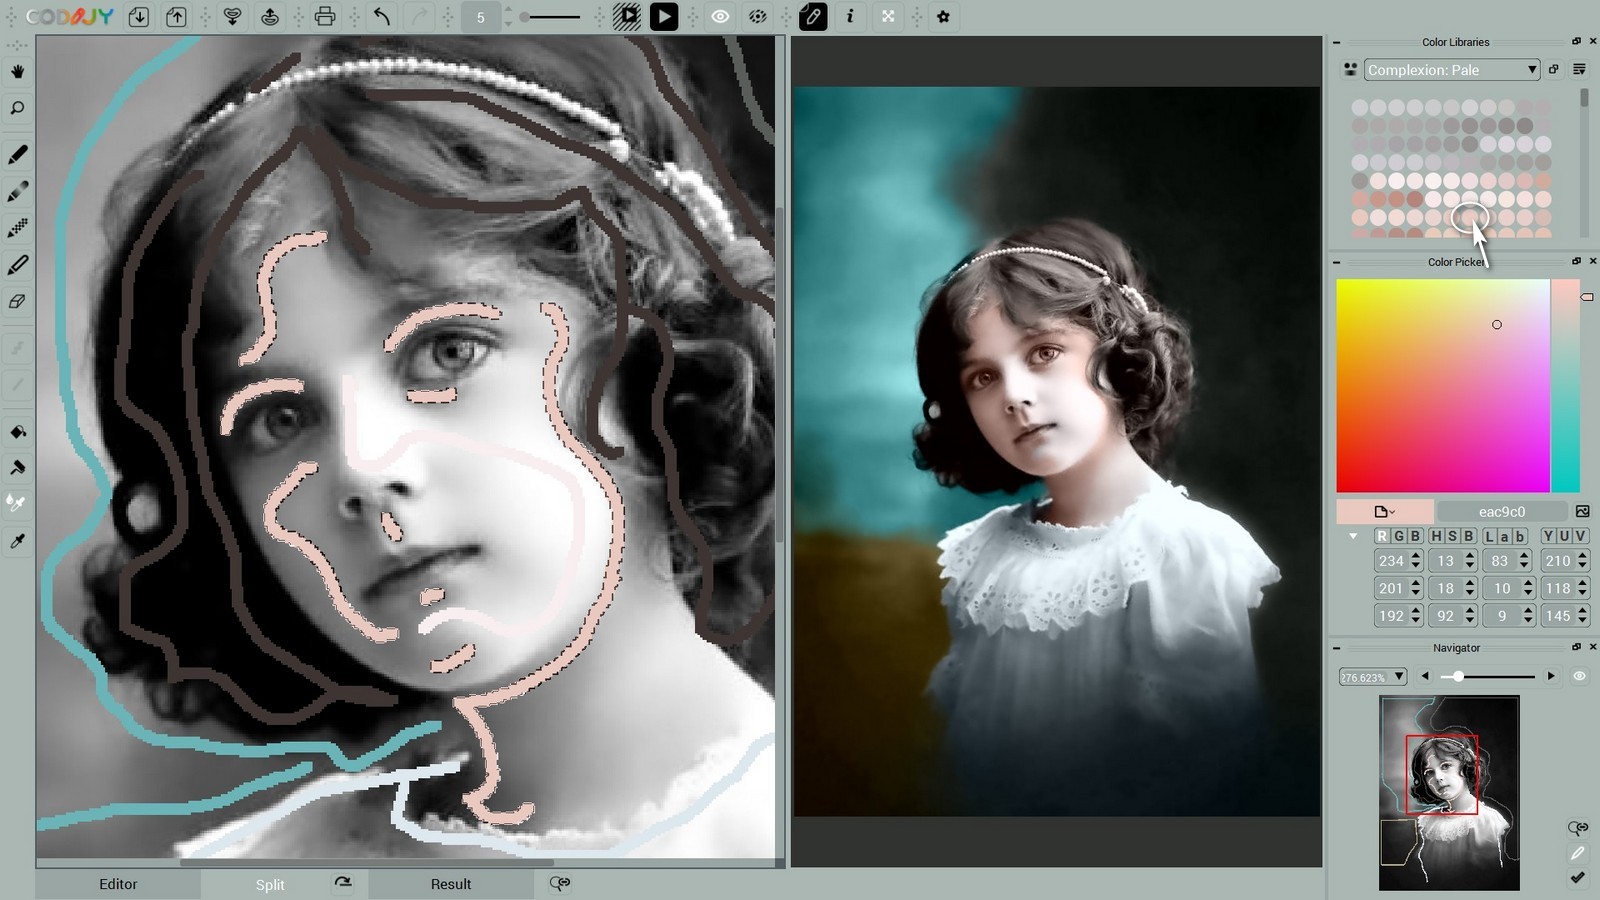
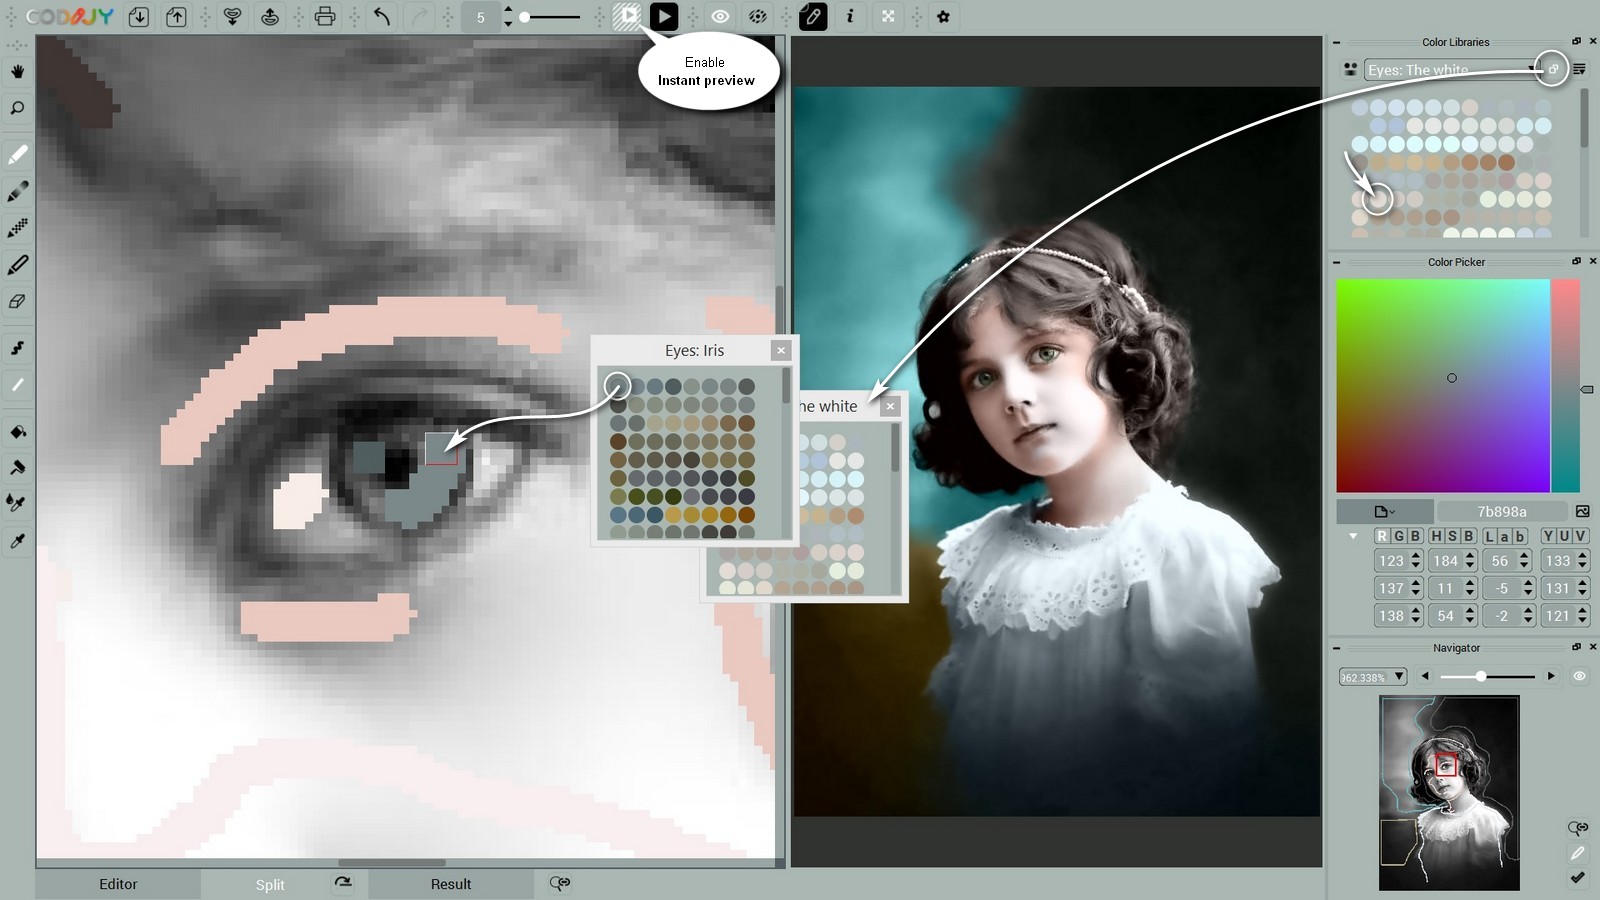
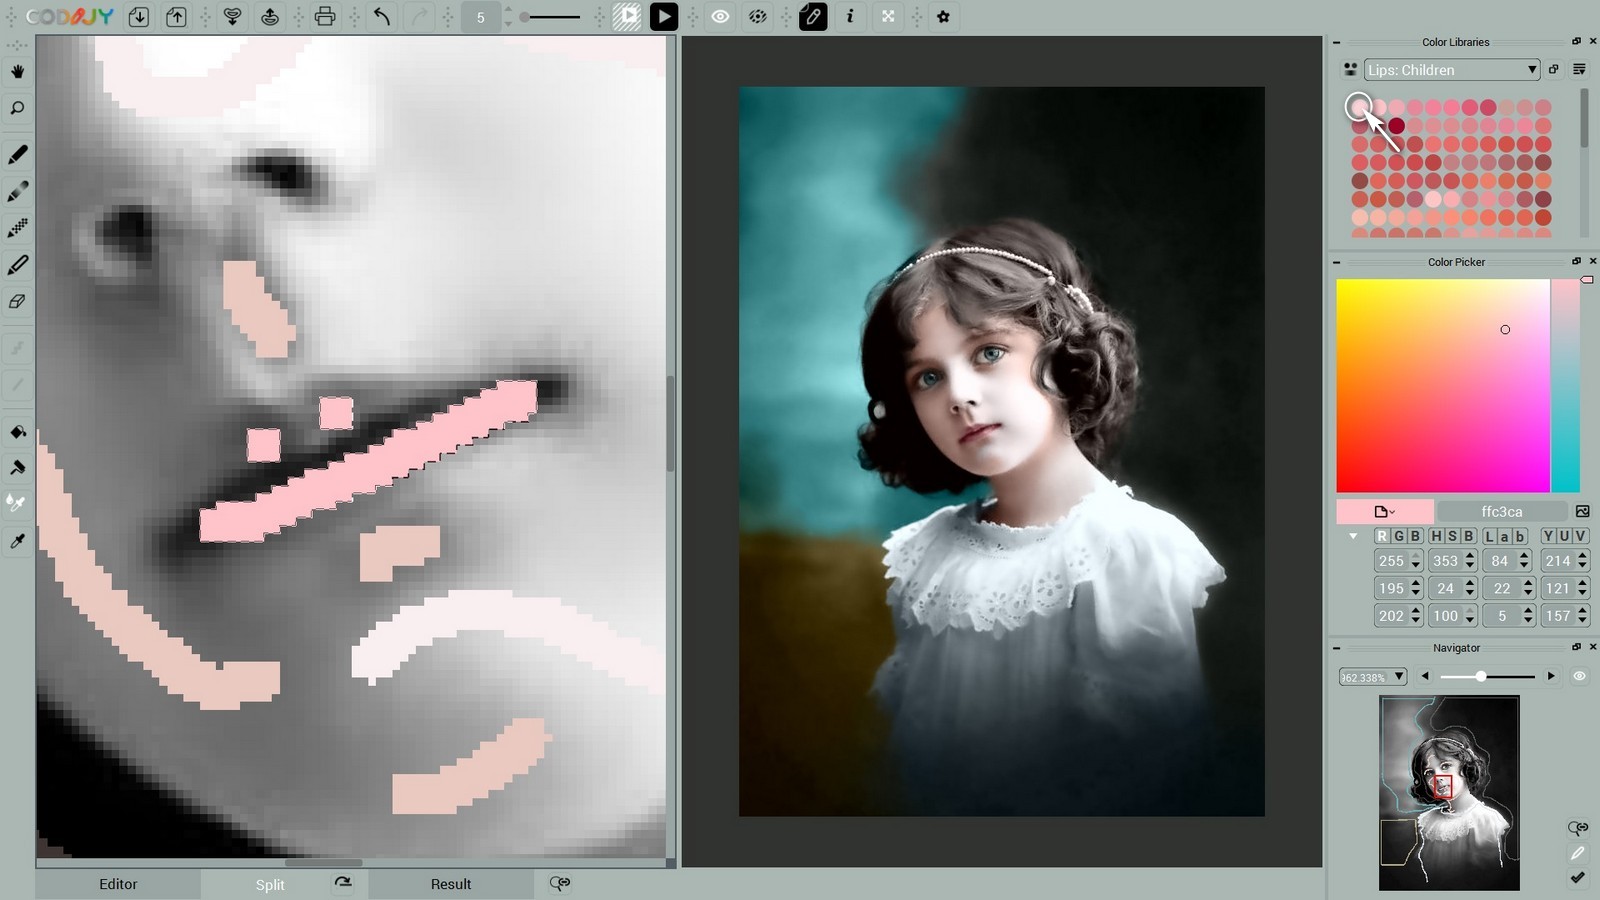
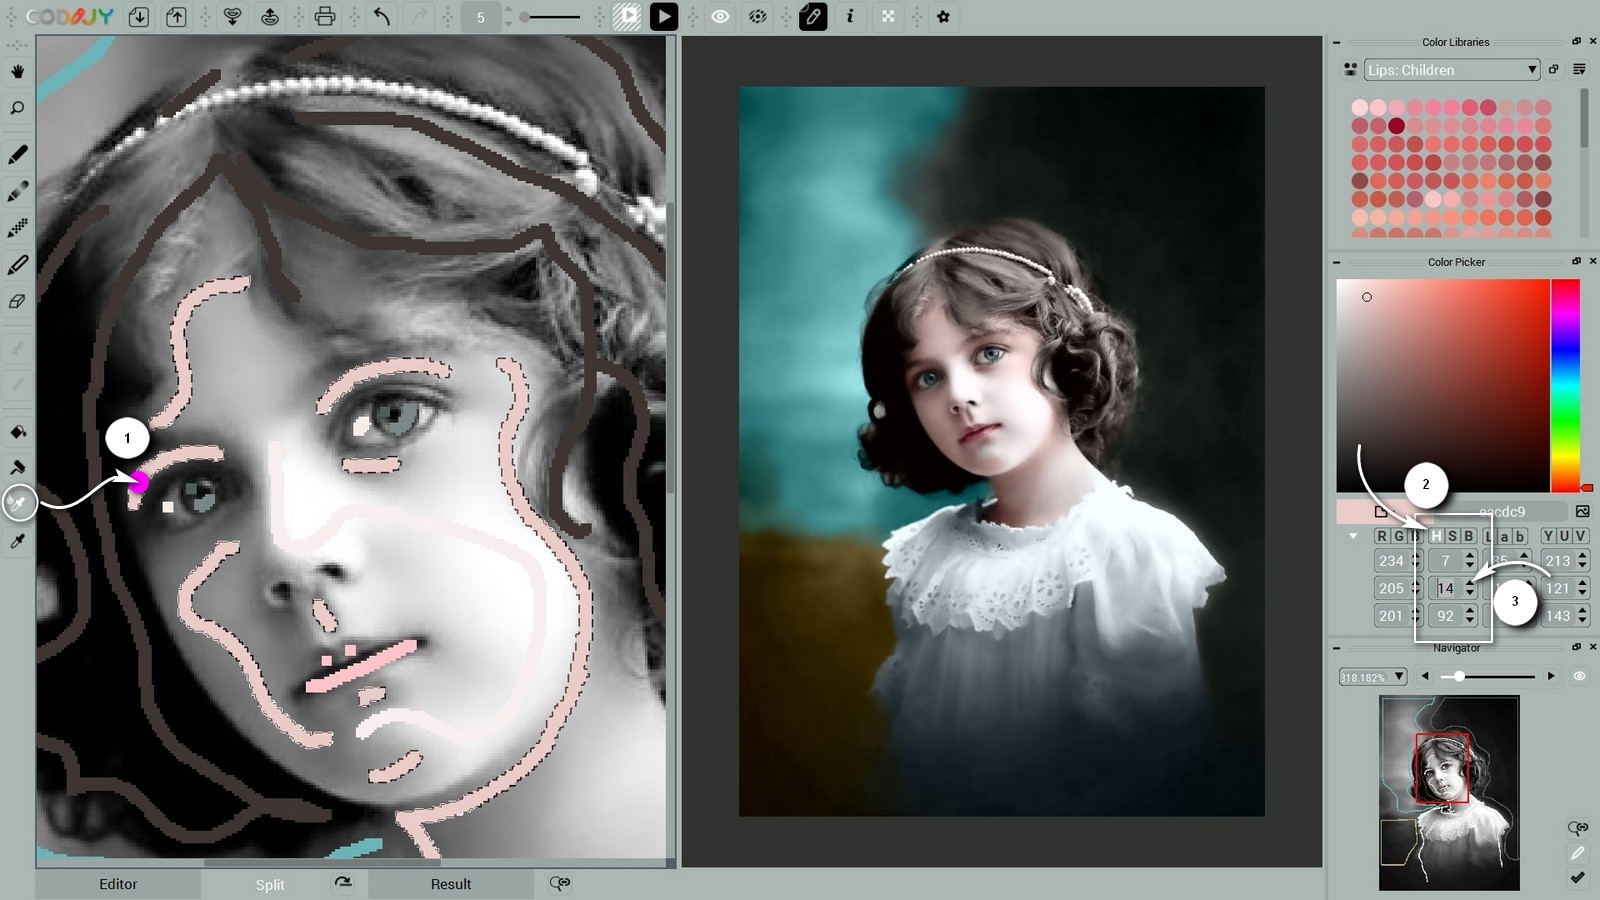
It’s time to check the result. Launch Image Processing . Switch to the Split view using the tabs at the bottom of the window . 

Make sure that the dress and the backdrop both look neat. The colors may spread out to the areas without strokes. This will be gone after we add masks to all areas. 

Colorize the hair

->  Open the Hair: Brown library   

It’s obvious that the girl was dark-haired. Pick a saturated shade from the related thematic library and outline the hair accurately.   

Facial colors

If you look at the color color photo of a girl, you will notice that the skin has highlights of a slightly different hue. We will make an attempt to recreate this tone in our colorization by adding a light tone of pink. This will let us reproduce natural colors in the the photo we colorize. 

Add colors to highlights

Tip: For your convenience, disable View Synchronization and zoom in the work area image in Navigator. 

->  Open the Complexion: Pale library

Select a light shade of pink from the library and apply it to the girl’s nose and chin. You can add color to all these areas with a single stroke, as shown in our example.  

Next, choose a saturated skin tone and draw strokes over the forehead and cheeks. Outlining eyes will help prevent their colors from spreading out after we cover them with the color masks. 

Colorize the eyes

Tip: Avoid using the strokes of the Decolor pen, a pure white tone or the shades of blue to colorize the eye whites. This may make the eyes look unnaturally blue!  

->  Open the Eyes: the White and Eyes: Iris libraries

Apply the beige color to the whites of the eyes. This neutral shade will look good in most of the photos. Then add a shade of gray to colorize the iris of the eye. 

->  Open the Lips: Children library

Select the related library and pick the shade of pink. Minimize the brush width if needed.  

Generate the color preview and check the colors at the edges.

Edit colors

Analyze the result. Do all color match your desired color scheme?  In our example, the facial shadows look excessively saturated and yellow and we want to edit them.

As we have several strokes of this tone, we wish to repaint them all at once. For this, we enable the Group Repaint Color Picker tool and click one of the strokes to select all instances of the same color. 

Next we changed the parameters of the color in the dropdown color parameters of the Color Picker. Now they are Hue – 7, Saturation – 14 and Brightness – 19 and the new tone looks natural and adds a touch of pink. 

We hope that you enjoyed colorizing this photo and find its result inspiring! Now pick a new example and apply your new skills to it! 

Resources

How to access the document history

In the majority of layouts layouts, You can find the History tab on the right.

If it’s not there, please enable the History window under the View menu or from the context menu. 

Quick draw shortcuts

You can draw the line masks without releasing the mouse button or raising a pen. Here are several useful hotkeys: 

  • When you finish drawing the line, press Spacebar to cut the previous line.  Then start drawing in the new direction. 
  • You can switch to the freehand drawing, when you are in the Line mode. After you finish the line, hold down the Spacebar to draw the curve. When you are done, release the Spacebar and keep drawing the lines.
  • To lock the angle between the previous and the new strokes, press and hold the Shift key until you complete its drawing.
  • To delete the last segment, press Esc.


While drawing a straight line, don’t release the button or lift the pen – just press the keys!